Hello Friends,In this blog I will give detail information of Remote Blob storage.
Storing Documents on Local By Using RBS from SharePoint.
Steps:
A) Enable FILESTREAM on the database server
- On the Start menu, point to All Programs, point to Microsoft SQL Server 2008 R2, point to Configuration Tools, and then click SQL Server Configuration Manager.
- In the list of services, right-click SQL Server Services, and then click Open.
- In the SQL Server Configuration Manager snap-in, locate the instance of SQL Server on which you want to enable FILESTREAM.
- Right-click the instance and then click Properties.
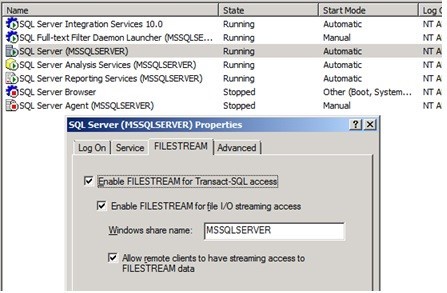
- In the SQL Server Properties dialog box, click the FILESTREAM tab.
- Select the Enable FILESTREAM for Transact-SQL access check box.
- If you want to read and write FILESTREAM data from Windows, click Enable FILESTREAM for file I/O streaming access. Enter the name of the Windows share in the Windows Share Name box.
- If remote clients must access the FILESTREAM data that is stored on this share, select Allow remote clients to have streaming access to FILESTREAM data.
- Click Apply. See below:
10. In SQL Server Management Studio, click New Query to display the Query Editor.
11. In Query Editor, enter the following Transact-SQL code:
EXEC sp_configure filestream_access_level, 2
RECONFIGURE
12. Click Execute.
B) Provision a BLOB store for each content database
- Click Start, click All Programs, click Microsoft SQL Server 2008, and then click SQL Server Management Studio.
- Connect to the instance of SQL Server that hosts the content database.
- Expand Databases.
- Click the content database for which you want to create a BLOB store, and then click New Query.
- Paste the following SQL queries in Query pane, and then execute them in the sequence listed.use [WSS_Content]
if not exists (select * from sys.symmetric_keys where name = N’##MS_DatabaseMasterKey##’)create master key encryption by password = N’Admin Key Password !2#4′use [WSS_Content]
if not exists (select groupname from sysfilegroups where groupname=N’RBSFilestreamProvider’)alter database [WSS_Content] add filegroup RBSFilestreamProvider contains filestreamuse [WSS_Content]
alter database [WSS_Content] add file (name = RBSFilestreamFile, filename = ‘C:\Blobstore’) to filegroup RBSFilestreamProvider
Note: In All the three queries replace [WSS_Content] with the content database name, and replace c:\BlobStore with the volume\directory in which you want the BLOB store created. The provisioning process creates a folder in the location that you specify. Be aware that you can provision a BLOB store only one time. If you attempt to provision the same BLOB store multiple times, you will receive an error.
Commands should be successfully completed.
Verify:
Blobstore folder would be created under the path given. There would be a folder and a file in it.
C) Install the RBS provider components on each server (SQL and Web Server)
Note: First install RBS on SQL server then First Web server then additional Servers.
To install RBS on SQL server and then First Web server follow the below steps.
- Browse to http://www.microsoft.com/download/en/details.aspx?id=16978 find rbs.msi download X64 Package.
Note: Do not download the rbs_x64 link given in TechNet article http://technet.microsoft.com/en-us/library/ee663474.aspx - Run cmd prompt as Administrator and then click OK.
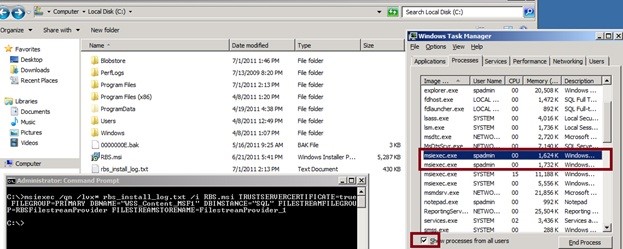
Change the directory to the place where rbs.msi is downloaded on the machine. - Copy and paste the following command into the Command Prompt window.msiexec /qn /lvx* rbs_install_log.txt /i RBS.msi TRUSTSERVERCERTIFICATE=true FILEGROUP=PRIMARY DBNAME=”WSS_Content” DBINSTANCE=”DBInstance Name” FILESTREAMFILEGROUP=RBSFilestreamProvider FILESTREAMSTORENAME=FilestreamProvider_1
Note:
Replace WSS_Content and DBInstance Name in the above command.rbs_install_log.txt is the installation log file generated in the same path where rbs.msi is located.
Verify:
1) The process of installation finishes in 1 min. See task manager, there would be two processes “msiexec.exe ” running with the SharePoint user account that you logged in. You can see these processes only if you enable show processes from all users.
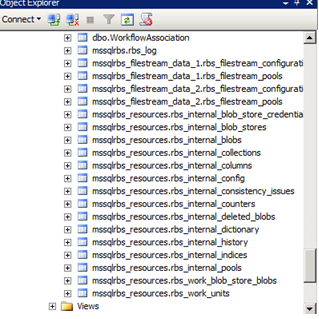
2) Verify if the Tables were created for the database WSS_Content. If there were no folders then the installation is not success. Verify Log file.
3) Verify the programs installed in control panel, SQL Server 2008 R2 Remote Blob Store is installed.
4) The size of the log file rbs_install_log.txt should be more than 1 MB. If you have less size then there should be some problem in the installation.
Troubleshoot in file size is less:
Open the log file scroll to the bottom you can see an entry that Installation Completed Successfully, but never trust that message. Find for errors and resolve the same.
Mostly the parameters passed in the above command should be wrong- check for db instance name, server name and especially spelling mistakes.
Note: Follow the same process and command for First Web server.
D) To install RBS on all additional Web and application servers
- Browse to http://www.microsoft.com/download/en/details.aspx?id=16978 find rbs.msi download X64 Package.
Note: Do not download the rbs_x64 link given in TechNet article http://technet.microsoft.com/en-us/library/ee663474.aspx - Run cmd prompt as Administrator and then click OK.
Change the directory to the place where rbs.msi is downloaded on the machine. - Copy and paste the following command into the Command Prompt windowmsiexec /qn /lvx* rbs_install_log.txt /i RBS.msi DBNAME=”WSS_Content” DBINSTANCE=”DBInstance Name” ADDLOCAL=”Client,Docs,Maintainer,ServerScript,FilestreamClient,FilestreamServer”
Note:
Replace WSS_Content and DBInstance Name in the above command.
rbs_install_log.txt is the installation log file generated in the same path where rbs.msi is located.
Verify:
The size of the log file rbs_install_log.txt should be less than 1 MB, vice versa for SQL and First Web Server.
Open the log file scroll to the bottom you can see an entry that Installation Completed Successfully, but never trust that message. Find for errors and resolve the same.
Mostly the parameters passed in the above command should be wrong- check for db instance name, server name and especially spelling mistakes .
E) Enable RBS for each Content Database from Web Server:
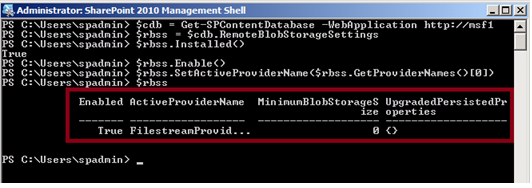
Open SharePoint PowerShell as Administrator and perform the steps below:
$cdb = Get-SPContentDatabase –WebApplication <URL>
$rbss = $cdb.RemoteBlobStorageSettings
$rbss.Installed()
$rbss.Enable()
$rbss.SetActiveProviderName($rbss.GetProviderNames()[0])
Verify:
1. Executing $rbss.Installed() should return true, if false this may be due to the reason that RBS is not installed properly or RBS is not installed on other Web servers.
Verify RBS installation log on all the servers. If you think something is wrong uninstall RBS from control panel and re-install using step C or D.
- Type $rbss and verify that ActiveProviderName is not Null. See below
F) Test the RBS Installation:
- Open the Web Application where blob store is enabled.
- Open a library or list where we can upload documents.
- Upload a document whose size limit is more than 60 KB.
- Browse to Blob Store Folder on the SQL server and verify the latest modified folder. The document should be present in it.
The other way of checking this is to run below query on SQL database.
Select * from AllDocstreams where RBSID IS NOT NULL
Note: RBS_ID has some value indicates that the document is in Blob Store. If it is null then it indicates that the data was present in SQL database itself.
Note:
The Blob Threshold limit by default is 60 KB. This explains that only documents whose size is more than 60 KB are being moved to Blob Store.
This setting can be verified by running the below query on the content database and checking the value for the column “extended_configuration” for the record matching your Filestream provider name stored in the “blob_store_name” column.
Use [WSS_Content]
select * from mssqlrbs_resources.rbs_internal_blob_stores
G) Adjust Blob Threshold:
We can change the Blob Threshold limit for a content database my executing below commands as Powershell Administrator on any Web Sever .
$cdb = Get-SPContentDatabase –WebApplication <URL>
$cdb.RemoteBlobStorageSettings.MinimumBlobStorageSize=1048576
$cdb.Update()
Note: 1048576 = 1MB, files size more than 1 MB would be moved to blob store.
H) Move Content In and Out of RBS:
1) Move Content from SQL to RBS:
The content database might be in use for many days and you have enabled RBS later, you want to move the content to RBS Blob Store. To achieve this execute the below commands as administrator of powershell on any Web
Server
$cdb = Get-SPContentDatabase –WebApplication <URL>
$rbss = $cdb.RemoteBlobStorageSettings
$rbss.Migrate()
Note :
1.Please note that when you run this command the server begins copying data from the database to the file system. If you’ve got a lot of data in the database, it may take a while.
- The Blob Threshold apply here, all the docs whose threshold limit is more than the specified values are pushed to the Blob Store.
Verify:
Browse to Blob Store Folder on the SQL server and verify the latest modified folder, the documents should be present in it.
Execute the query select* from AllDocStreams where RBSID IS NULL it should return zero results. The data from “content” column is pushed to ”RBSID” column and the Content Column is made NULL.

2) Move Content from RBS to SQL:
We need to disable RBS and move the content back to SQL. To achieve this execute the below commands as administrator of powershell on any Web server.
$cdb = Get-SPContentDatabase –WebApplication <URL>
$rbss = $cdb.RemoteBlobStorageSettings
$rbss.SetActiveProviderName(“”)
$rbss.Migrate()
Note:
SetActiveProviderName(“”) disables RBS, $rbss.Migrate() migrates the content back to SQL as ActiveProviderName is Blank.
The documents were copied to SQL but they were not deleted from Blob Store, so before performing this action plans that the SQL server has more free space.
If you want to move the content to another provider execute below commands.
$rbss.SetActiveProviderName(“Name of the provider”)
$rbss.Migrate()
Verify:
Execute the query select* from AllDocStreams where RBSID IS NOT NULL it should return zero results. The data from column “RBSID” is pushed to “content” column and the RBSID column is made NULL.
To double check that this, delete any known file manually from Blob Store and try to access the same from UI.
I) Uninstall RBS on a Web Server:
Note: Perform uninstall of RBS only if RBS fails during its installation.
Uninstall is achieved in 3 ways.
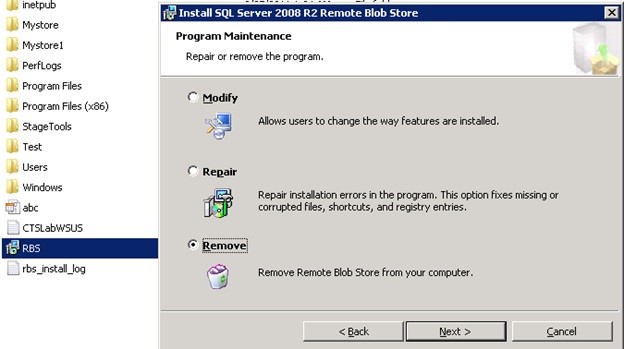
- Remove RBS from Control Panel
Control Panel -> Add or Remove Features -> SQL Server 2008 R2 Blob Cache
- Run CMD as Administrator and navigate to the path where rbs.msi is located and execute the below command
msiexec /qn /lvx* rbs_install_log.txt /x RBS.msi DBNAME=”WSS_Content” DBINSTANCE=”DBInstanceName” ADDLOCAL=”Client,Docs,Maintainer,ServerScript,FilestreamClient,FilestreamServer”
- Double click on RBS.msi and uninstall (not recommended)
J) Completely remove RBS on a Content database and also from server:
- Backup 1st: Backup site collection with stsadm, backup SQL db, backup RBS blob storage.
- Migrate all content off RBS to SQL and disable RBS for content db:On Webserver execute the below commands.
$cdb=Get-SPContentDatabase <ContentDbName>
$rbss=$cdb.RemoteBlobStorageSettings
$rbss.GetProviderNames()
$rbss.SetActiveProviderName(“”)
$rbss.Migrate()
$rbss.Disable()
Verify:
Type $rbss and you should see that Activeprovidername is NULL and Enabled is false.
3. Change the default RBS garbage collection window to 0 on your content db:
Execute the below commands in SQL server on the query editor for the content database.
exec mssqlrbs.rbs_sp_set_config_value ‘garbage_collection_time_window’, ‘time 00:00:00’;
exec mssqlrbs.rbs_sp_set_config_value ‘delete_scan_period’, ‘time 00:00:00’;
exec mssqlrbs.rbs_sp_set_config_value ‘orphan_scan_period’, ‘time 00:00:00’
4. Change the default RBS garbage collection window to 0 on your content db:
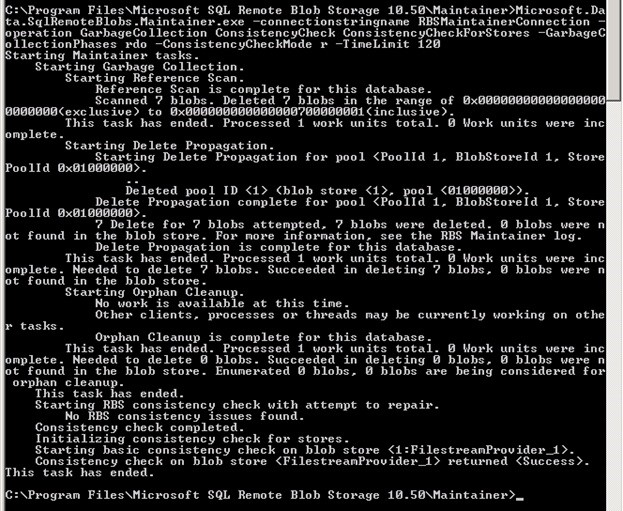
On Sql server open CMD prompt as Administrator and navigate to the path “C:\Program Files\Microsoft SQL Remote Blob Storage 10.50\Maintainer”
Execute the command “Microsoft.Data.SqlRemoteBlobs.Maintainer.exe -connectionstringname RBSMaintainerConnection -operation GarbageCollection ConsistencyCheck ConsistencyCheckForStores -GarbageCollectionPhases rdo – ConsistencyCheckMode r -TimeLimit 120”
See below:
On the content db RUN:
exec mssqlrbs.rbs_sp_uninstall_rbs 0
Verify the below:
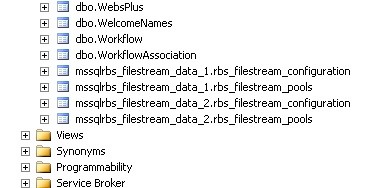
Only few tables are left in the database, all other tables have been deleted.
Execute Below commands on the content database:
ALTER TABLE [mssqlrbs_filestream_data_1].[rbs_filestream_configuration] DROP column [filestream_value]
ALTER TABLE [mssqlrbs_filestream_data_1].[rbs_filestream_configuration] SET (FILESTREAM_ON = “NULL”)
Note: If you have mssqlrbs_filestream_data_2 run the below two commands as well.
ALTER TABLE [mssqlrbs_filestream_data_2].[rbs_filestream_configuration] DROP column [filestream_value]
ALTER TABLE [mssqlrbs_filestream_data_2].[rbs_filestream_configuration] SET (FILESTREAM_ON = “NULL”)
Now you can remove the file and filegroup for filestream:
ALTER DATABASE WSS_Content Remove file RBSFilestreamFile;
ALTER DATABASE WSS_Content REMOVE FILEGROUP RBSFilestreamProvider;
Verify: This will remove the Blob Folder from the file system however still few tables exist as shown in the previous screen shot
Note: Perform all the above steps on other content databases if you want to remove RBS on them.
Uninstall from add/remove SQL Remote Blob Storage from SQL and Webservers.
Disable filestream in SQL Configuration Manager for your instance (if you do not use it anywhere aside this single content db with sharepoint), run SQL reset and iis reset and test.
Thanks,
Samadhan Kshirsagar.
